The user interface for SimCity (2013) is sleek, with a wide variety of selections available for players. Below is an in-depth look at the entire interface.
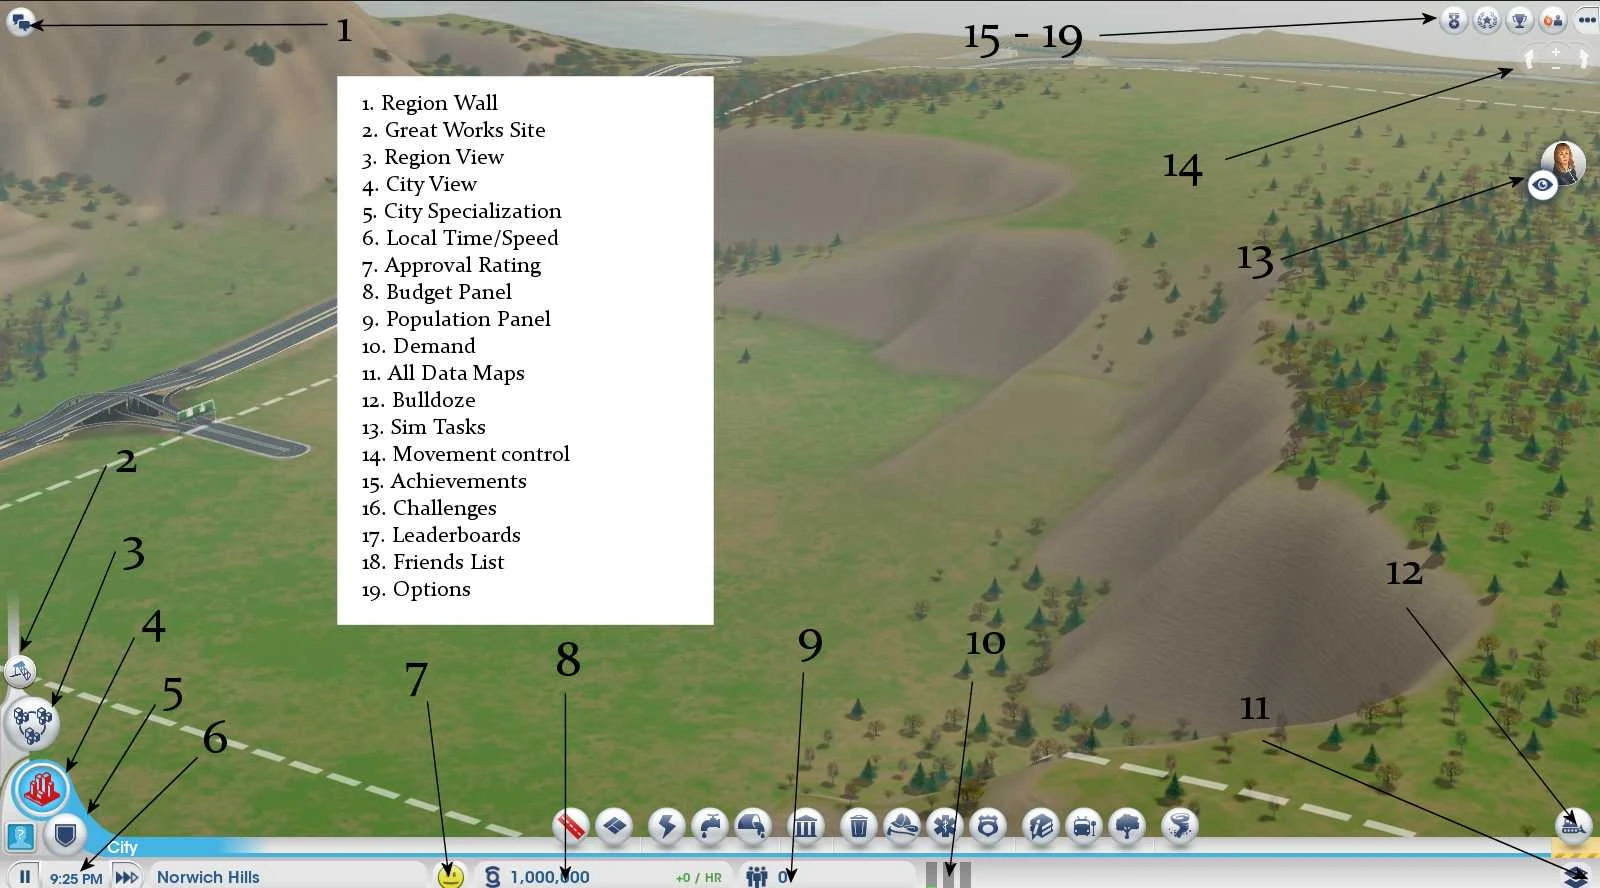
 Region Wall: Chat across the region, replying to and sending messages
 Great Works: Choose from a Solar Farm, International Airport, Space Center, or Arcology
- Great Works can be initiated by any city once they have met the requirements. Cities must be connected to a Great Work to benefit from them. Great Works can provide power, jobs, tourism, and economic boosts to a city.
 Region View: snap out of city view to get a view of the entire region; Players can see all the cities and great works sites and get information about them.
- City View: snap in from the region view above to enter the city view; from here players can zoom in further to focus on individual aspects of the city. The main selection tools players will use are also here along the bottom center of the screen:
- Roads: select a variety of roads in different layouts (straight, square, etc.), as well as one-click upgrade of selected roads. The roads that are available are Low Density Dirt Road, Low Density Street, Medium Density Street, High Density Street, Medium Density Avenue, High Density Avenue, High Density Streetcar Avenue
- Zones: select a variety of zones to lay. You can also dezone areas.
- Power: select a variety of power stations to supply energy to cities. The right menu shows city power usage, if the city is selling to anyone, and the available cities that sell excess power. There are also four maps: power, wind, air pollution, and radiation. The following stations are available.
- Wind Power Plant: this will also bring up the wind direction map
- Coal Power Plant, Oil Power Plant, Solar Power Plant, Nuclear Power Plant
- Water: the right menu shows the water usage of the city, the water pollution level, if the city is selling excess water/if excess water is available for purchase. It also shows four maps: water table, ground pollution, germs, and health. The following structures are available.
- Water Tower, Water Pumping Station - both bring up the water table map
- Sewage: shows how much sewage is being treated, if it is outsourced, as well as a sewage map and ground pollution map. The following structures are available to build.
- Sewage Outflow Pipe, Sewage Treatment Plant
- Government: the various official city buildings are located here, including the Town Hall, Mayor's House, and Mayor's Mansion. The right menu shows the density of the population and also has happiness, population, and building density maps.
- Waste Disposal: the waste management arm of the city, the right menu shows the number of garbage cans and recycling bins collected daily, as well as if the city is covering or being covered by another city. The maps are: waste disposal, ground pollution, and air pollution. There are two buildings available.
- Garbage Dump, Recycling Center
- Fire: pertains to the fire department. The right menu shows number of buildings burned, number of fires extinguished, and number of hazmat fires extinguished per day. It also has fire risk, water table, and waste disposal maps. There are two available buildings.
- Fire Station, Large Fire Station
- Health: relating to the health department. The right menu shows deaths, injured treated, and sick treated per day. It also has a variety of maps, including health, germs, air pollution, ground pollution, and radiation. There are two available buildings.
- Clinic, Hospital
- Police: relating to the police department. The right menu shows crimes and arrests per day, as well as maps showing crime and education. There are two available buildings.
- Police Station, Police Precinct
- Education: helps in increasing the education of the city's sims. The right menu shows students enrolled at area schools, education and tech levels, and where they are traveling to and from. It also has education and industrial tech maps. There are a variety of structures available for building.
- Grade School, School Bus Stops, High School, Public Library, Community College, University
- Mass transit: for all the city's transportation needs. This is divided into several subcategories. Each shares the right menu in showing average wait time, riders per day, and where that particular mode of transportation is connected to.
- Buses: shows a bus, population, and tourism maps to the right; selections include Shuttle Bus Depot, Bus Stops, Park and Ride, and Bus Terminal
- Streetcars: note that you have to lay track throughout the city for this. Shows streetcar, population, and tourism maps; selections include Streetcar Depot, Streetcar Stop, High Density Streetcar Avenue, Streetcar Tracks
- Trains: rail also has to be laid for this; nearby tracks that potentially connect to the city are shown on the outskirts. Shows train, population, and tourism maps. Selections include Passenger Train Station and Heavy Rail Tracks
- Boats: note that a water connection is required; shows boat, population, and tourism maps. The only selection is a Ferry Terminal.
- Planes: shows population and tourism maps. A Municipal Airport is available.
- Parks: a large variety of parks are available to enhance the lives of the city sims. The right menu displays visitors per day as well as residential and commercial wealth. Maps include land value, happiness, and tourism. The parks are divided into the below categories, each category more expensive than the next.
- Basic: Blacktop Park, Swings Playground, Rides Playground, BBQ Pit, BBQ Pavilion, Water Park Playground, Small Field, Small Field w/ Parking, Medium Field w/ Parking, Large Field w/ Parking
- Sports: Public Tennis Court, Basketball Court, Volleyball Court, Medium Skate Park, Large Skate Park, Soccer Field, Baseball Field
- Nature: Pond, Wavy Path Park, Straight Path Park, Colorful Path Park, Tall Tree Row, Short Tree Row, Medium Path Park, Tree-Lined Walkway, Wavy Tree-Lined Walkway, Large Path Park, City Park, Community Park; there is also the ability to plant a forest and clear a forest
- Plaza: Flower Plaza, Double Walkway, Small Sculpture Garden, Simple Walkway, Medium Sculpture Garden, Large Sculpture Garden, Large Urban Sculpture Garden, Urban Greenspace, Tiered Urban Greenspace
- Formal: Fountain Plaza, Fenced Mountain Plaza, Small Fountain Park, Reflecting Pool Park, Large Fountain Park, Amphitheater
- Disasters: the disasters menu, where players can manually choose which disasters befall their city. These are unlocked via various achievements.
- City Specialization: Cities can specialize in certain industries depending upon their resources. More than one specialization can be chosen at a time, as some of them need to be used together:
- Mining: Extract coal or raw ore from the land and ship it to the Global Market. The right menu shows amount of mining and smelting currently being done in a day along with coal, ore, and trade maps. The following buildings are available.
- Coal Mine: selecting this to place will also call up a city map that shows the coal deposits in the area
- Ore Mine: selecting this to place will also call up a city map that shows the ore deposits in the area
- Metals HQ, Smelting Factory, Advanced Coal Mine
- Drilling: Drill deep into the ground to extract black gold! The right menu shows the amount of drilling and refining done in a day along with oil deposit and trading maps. The following buildings are available.
- Oil Well: selecting this to place will also call up a city map that shows the oil reserves in the area
- Petroleum HQ, Oil Refinery
- Trading: Important centers for trading. The right menu shows top goods, profit, and price as well as a trade map. The following buildings are available.
- Trade Depot, Trade HQ, Trade Port
- Electronics: factories convert simple resources into complex electronics. They can then be sold on the Global Market or used at a Great Works site. The right menu shows the amount of processors, TVs, and computers produced in a day, as well as a trade map and industrial tech map. The following buildings are available.
- Processor Factory, Electronics HQ, Consumer Electronics Factory
- Culture: essentially building up tourism by increasing the attractiveness of a given city. The right menu shows total tourists per day (with last event profit/profit per day) as well as a tourism map and land value map. The following buildings are available.
- Expo Center, Pro Stadium, Arc de Triomphe, Cinquantenaire Arch, Dutch Windmill, Edifício Copan, Empire State Building, Giralda, Globe Theatre, Kölner Dom, Leaning Tower of Pisa, Oslo Opera House, Rundetårn, Statue of Liberty, St. Basil's Cathedral, Stockholm City Hall, Sydney Opera House, Tokyo Tower, Zamek Królewski w Warszawie, Washington Monument, and Willis Tower
- Gambling: enables players to build their cities, or parts of them, into gambling empires. This tends to prompt a higher crime rate. The right menu shows profits per day as well as a tourism map. The following buildings are available.
- Gambling House, Gambling HQ, Sci-Fi Casino, Sleek Casino, Elegant Casino
- Mining: Extract coal or raw ore from the land and ship it to the Global Market. The right menu shows amount of mining and smelting currently being done in a day along with coal, ore, and trade maps. The following buildings are available.
- Local time and speed: Shows the local time of the city and gives players the option to pause time or increase it by varying levels - Turtle, Llama, and Cheetah. Especially useful for generating income in a shorter amount of time or slowing time down in order to manage a crisis.
- Approval Rating: This gives a visual representation of the approval rating that city residents give their mayor. Clicking will open up a menu that parses out the rating into Residential, Commercial, and Industrial. Clicking further will give hints as to what each category of citizens is happy or unhappy about.
- Budget Panel: This shows the current wealth of the city, as well as how much the city is making per hour. Clicking on this will open a large graph that splits all the money (generated and spent) into various categories for easy viewing. Taxes can be adjusted here (assuming the city has the correct building in place) and bonds can be selected.
- Population Panel: this shows the number of sims living in the city. Clicking this will open a chart that splits the information further into locals/visitors, low/medium/high population wealth, and history and details charts that also show workers/shoppers/industrial freight/students/homeless.
- Demand: this shows the demand of the various city sims in an easy to read format, splitting it into residential, commercial, and industrial. The larger the particular bar, the more zones that should be laid pertaining to that category. Clicking also brings up the zone tool.
- All Data Maps: In one click you can access all the various maps that are usually spread across many menus. There are thirty maps total.
- Bulldoze: this brings up the bulldozing interface, allowing players to select zones or buildings they want to delete. The right menu shows the number of currently abandoned buildings and rubble that need attention. The icon will also change to a bulldozer.
- Sim Tasks: Tasks that sims would like you to do, or those that you accept from sims, will be placed in the right side of the screen. These will revert to collapsed until clicked on.
- Movement controls: Though players can use their mouse to move around the screen, this offers more finite control. It offers clockwise and counter-clockwise rotation, as well as zoom capabilities.
- Achievements: opens the achievements panel. This displays all available achievements across various categories. Grayed out ones are those not completed, while completed shows with full colors. Note that some game features, such as disasters, are not available until certain achievements are completed.
- Challenges: opens the challenges panel. This displays any upcoming challenges, as well as the leaderboards for the current challenge and the top 10%.
- Leaderboards: opens the leaderboards panel. This shows the rankings of players against one another across a variety of subjects, including population, wealth, approval, etc. This is able to be filtered by friends, region, or global. A Headquarters tab also ranks success in specializations.
- Friends List: self-explanatory. Players can look here to select their friends or find new ones.
- Options: this is where players can tweak the game settings, peruse the game manual, hit up the help center, exit, or quit.